The dangerous use of tools like ANY.RUN

ANY.RUN allows users to upload suspicious files and URLs for dynamic analysis. However, unless explicitly set to private or used under a commercial license, these uploads are publicly accessible. This means that anyone browsing the platform can view, download, and analyze the same files—posing serious risks when sensitive or proprietary data is involved.

Example 1: The Microsoft Defender Misfire Incident

In April 2025, a major incident occurred when Microsoft Defender XDR mistakenly flagged legitimate Adobe Acrobat Cloud links as malicious. This led to a flood of uploads to ANY.RUN by users trying to verify the safety of these links.

  • What happened: Over 1,700 Adobe files containing sensitive corporate data were uploaded to ANY.RUN’s public sandbox.
  • Why it mattered: These documents included confidential information from hundreds of companies, such as internal communications, financial records, and intellectual property.
  • ANY.RUN’s response: The platform quickly made these sessions private and issued warnings to users, urging them to use commercial licenses for work-related tasks.

This incident underscores how a simple misclassification by a security tool can trigger a chain reaction, leading to mass data exposure.

Example 2: Misunderstanding Privacy Settings

ANY.RUN’s interface and messaging have occasionally led to confusion among users regarding what is public and what is private.

  • User confusion: Some users believed that creating a free account would automatically keep their uploads private. However, unless explicitly configured, uploads remain publicly visible.
  • Community backlash: Cybersecurity professionals criticized ANY.RUN for unclear messaging, noting that many users were unaware of the public nature of their uploads until it was too late.

This highlights the importance of clear communication from platform providers—and vigilance from users.


Types of Data Commonly Exposed

  • Corporate documents: Internal reports- Corporate documents, strategy documents: Internal reports, strategy documents, and financial statements, and financial statements.
  • Customer data.
  • Customer data: Personally identifiable: Personally identifiable information (PI information (PII), contracts, and support logs. -I), contracts, and support logs.
  • Credentials Credentials: Configuration files: Configuration files containing usernames containing usernames, passwords, or API, passwords, or API keys.
  • Malware samples: Propriet keys.
  • Malware samples: Proprietary or targeted malware used in red teamary or targeted malware operations or threat used in red team operations or threat research.

Mitigation Strategies

To avoid public exposure, users should adopt, users should adopt the following practices the following practices:

  • Use private sessions: Always verify that your verify that your analysis is set analysis is set to private before to private before uploading, or make sure the document isn’t private information.
  • Upgrade to a commercialUpgrade to a commercial license: For professional license: For professional or sensitive work, use a paid plan or sensitive work, use a paid plan that guarantees that guarantees privacy controls privacy controls.
  • Double-check file contents file contents: Before uploading, ensure the file: Before uploading, ensure the file doesn’t contain sensitive data that doesn’t contain sensitive data that could be inadvertently shared.
  • Educ could be inadvertentlyate your team: shared.
  • Educate your team: Make sure everyone understands the Make sure everyone understands the platform’s privacy settings and implications.

Public exposure platform’s privacy settings and implications.

Public exposure on ANY.RUN is not on ANY.RUN is not just a theoretical just a theoretical risk—it has already led to real-world risk—it has already led to real-world data leaks. By understanding data leaks. By understanding how these exposures how these exposures happen and taking happen and taking proactive steps proactive steps, users can harness, users can harness the power of ANY.RUN without compromising security. If you’d the power of ANY.RUN without compromising security. If you’d like, I can walk you through how to safely configure a session or explore like, I can walk you through how to safely configure a session or explore alternative sandboxing tools with stricter privacy controls.

Sources:
https://cybernews.com/security/anyrun-users-leak-sensitive-data-after-microsoft-defender-misfire/
https://cybersecuritynews.com/microsoft-defender-xdr-false-positive-leads-to-massive-data-leak/
https://gbhackers.com/microsoft-defender-xdr-leaked-sensitive-documents/

Posted in 2025 | Leave a comment

Setting up Entra ID B2B Collaboration

Setting Up Azure Entra ID B2B Collaboration – A Detailed, Fact‑Based Guide


1. Prerequisites & Planning

ItemWhy It Matters
Azure Entra ID tenant (the “host” tenant)All B2B relationships are anchored in a single tenant that you control.
Appropriate licensingAzure AD Premium P1 (or higher) is required for most B2B features such as conditional access policies, entitlement management, and advanced security reporting.
External partner identificationKnow the domains, user types (guest vs. member), and the level of access each partner needs.
Governance policyDefine who can invite guests, what resources they may access, and any compliance constraints (e.g., data residency).
Conditional Access strategyDecide whether you’ll require MFA, device compliance, or location restrictions for guest sign‑ins.

2. Enable External Collaboration Settings

  1. Navigate to Azure portal → Azure Entra ID → External Identities → External collaboration settings.
  2. Set “Guest user permissions are limited by default” to Yes if you want guests to start with minimal rights.
  3. Configure “Invitation redemption” – allow guests to redeem invitations via email or direct link.
  4. Restrict allowed domains (optional) – under “Domain restrictions”, specify which external domains may be invited, useful for whitelisting trusted partners.

Why: These settings establish the baseline security posture for all incoming B2B accounts.


3. Invite Guest Users

3.1 Manual Invitation (Portal)

  1. Azure Entra ID → Users → New guest user → Invite user.
  2. Fill in:
    • Email address of the external user.
    • Display name (optional).
    • Message (optional, but helps with context).
  3. Select “Send invitation”. The guest receives an email with a redemption link.

3.2 Bulk Invitation (CSV)

  1. Prepare a CSV file with columns UserPrincipalNameDisplayNameInviteRedirectUrl.
  2. In Azure Entra ID → Users → Bulk create, upload the CSV.
  3. Review the import summary and confirm.

Tip: Use the bulk method for onboarding dozens or hundreds of partners at once.

3.3 Programmatic Invitation (Microsoft Graph)

POST https://graph.microsoft.com/v1.0/invitations
Content-Type: application/json
Authorization: Bearer <access_token>

{
  "invitedUserEmailAddress": "partner@example.com",
  "inviteRedirectUrl": "https://myapp.example.com",
  "sendInvitationMessage": true,
  "invitedUserMessageInfo": {
    "customizedMessageBody": "Welcome to our Azure environment – please accept the invitation."
  }
}
  • Requires Application permission User.Invite.All.
  • Automates invitation flows for SaaS platforms or custom provisioning pipelines.

4. Assign Access to Resources

  1. Create Azure AD groups (security or Microsoft 365) that represent logical permission sets (e.g., “Partner‑Finance‑Read”).
  2. Add guest users to the appropriate groups.
  3. Assign group memberships to Azure resources:
    • Azure RBAC – assign built‑in roles (Reader, Contributor, etc.) at subscription, resource group, or resource scope.
    • Microsoft 365 – grant SharePoint site, Teams channel, or Exchange mailbox access via the same groups.

Best practice: Keep guest permissions principle‑of‑least‑privilege; use groups to simplify future changes.


5. Conditional Access for Guests

  1. Azure Entra ID → Security → Conditional Access → New policy.
  2. Assignments → Users or workload identities → Select “Guest or external users”.
  3. Cloud apps or actions → Choose the apps you want to protect (e.g., Azure Portal, Office 365).
  4. Conditions → Locations / Device state – optionally block sign‑ins from high‑risk locations.
  5. Grant → Require multi‑factor authentication (MFA) and/or Require compliant device.
  6. Enable policy after testing with a pilot guest account.

Why: Conditional Access mitigates the risk of compromised guest credentials by enforcing additional verification steps.


6. Entitlement Management (Optional Advanced Governance)

  • Azure Entra ID → Identity Governance → Entitlement Management → Catalogs → New catalog.
  • Define access packages that bundle resource permissions, approval workflows, and expiration rules.
  • Guests request access via a self‑service portal; administrators approve according to policy.

Benefit: Automates lifecycle management (request, approval, review, removal) for large partner ecosystems.


7. Monitoring & Auditing

FeatureWhat to Look For
Sign‑in logs (Azure Entra ID → Sign‑ins)Unusual locations, repeated failures, MFA challenges.
Audit logs (Azure Entra ID → Audit logs)Guest creation, role assignments, policy changes.
Access reviews (Identity Governance)Periodic validation that guests still need their assigned permissions.
Azure AD Identity ProtectionRisk detections on guest accounts (e.g., leaked credentials).
  • Export logs to Log Analytics or Microsoft Sentinel for long‑term retention and correlation with other security events.

8. Licensing & Cost Considerations

LicenseGuest‑related Benefits
Azure AD FreeBasic B2B invitation, limited to 50,000 guest objects.
Azure AD Premium P1Conditional Access, entitlement management, access reviews, identity protection.
Azure AD Premium P2Advanced risk detection, privileged identity management for guests.
  • Guest users do not consume paid licenses unless you assign them to premium features (e.g., Azure AD P2 risk policies).
  • Monitor guest count to stay within free tier limits if you are on the free license.

9. Common Pitfalls & Mitigations

PitfallMitigation
Guests retain excessive rights after project endsImplement automated access reviews and set expiration dates on access packages.
MFA not enforced for guestsExplicitly include “Guest or external users” in Conditional Access policies that require MFA.
Domain restriction misconfiguration blocks legitimate partnersTest domain whitelist with a pilot guest before applying globally.
Invitation emails land in spamAdvise partners to whitelist @microsoft.com domains or use direct invitation links via secure portals.
Licensing overspendRegularly audit guest counts; move inactive guests to a “Disabled” state to keep the directory tidy.

Posted in 2025, B2B Collaboration, Entra ID | Leave a comment

Reset the DSRM password

Language: English

Active Directory will always validate a new Directory Services Repair Mode password to make sure it meets the domain’s password complexity requirements; this validation also calls into password filter dlls like Microsoft Entra Password Protection. If the new DSRM password is rejected, the following error message results:

C:\>ntdsutil.exe ntdsutil: set dsrm password Reset DSRM Administrator Password: reset password on server null Please type password for DS Restore Mode Administrator Account: ******** Please confirm new password: ******** Setting password failed. WIN32 Error Code: 0xa91 Error Message: Password doesn't meet the requirements of the filter dll's

When Microsoft Entra Password Protection logs the password validation event log event(s) for an Active Directory DSRM password, it is expected that the event log messages will not include a user name. This behavior occurs because the DSRM account is a local account that is not part of the actual Active Directory domain.

To reset the DSRM Password use the following command line

C:\>ntdsutil.exe ntdsutil: set dsrm password Reset DSRM Administrator Password: reset password on server null Please type password for DS Restore Mode Administrator Account: ******** Please confirm new password: ******** The password has successfully been reset (CTRL + C) to exit

“reset password on server null” null means reset on local machine

Posted in 2025, Uncategorized | Leave a comment

Unable to view RemoteApp in RDWeb

Language: English

Fun little issue that i had today, doing a installation of a RemoteApp on a new Windows Server 2019.

I had a problem where my RDWeb didn’t show any application once logged in. Luckily i had one RemoteApp server that already worked without any problems so i started compared things and ended up looking into the IIS

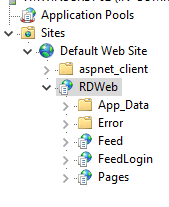
In the IIS I found that when you browse Sites > Default Web Site > RDWeb and select “Application Settings”

There is a setting called “radmcserver” this service should contain the FQDN of the connection broker, in my case it was empty.

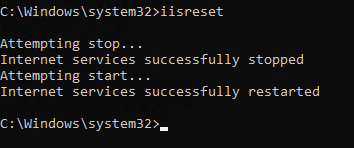
So in the value enter the FQDN (myserver.mydomain.com) and click OK, after open a command prompt (as administrator) and do a “iisreset”

Once it has completed refresh the RDWeb and you should now see the RemoteApps

Why it didn’t was in the “radmcserver” from the start I’m not sure about, I do remember that we had problem, first and had to reboot the Windows Server before we could continue.

Posted in 2025, RemoteApp, Windows Server | Leave a comment

Change the ‘krbtgt’ password

Language: English

Do not delete the krbtgt accounts for the RODCs. The krbtgt account for an RODC is listed in the format krbtgt_number.

If you use a customized password filter (such as passfilt.dll) on a DC, then you might receive an error when you try to reset the krbtgt password. For more information, including a workaround, see Microsoft Knowledge Base article 2549833 (Changing krbtgt password may fail – Application Developer ).

This operation should be performed twice, when resetting the krbtgt user, the reason for resetting it twice, a 10 hour waiting period is required between resets. 10 hours are the Maximum lifetime for user ticket and Maximum lifetime for service ticket in the policy settings.

  1. Connect to a domain controller
  2. Open Active Directory Users and Computers.
  3. Click View, and then click Advanced Features.
  4. In the console tree, double-click the domain container, and then click Users.
  5. In the details pane, right-click the krbtgt user account, and then click Reset Password.
  6. In New password, type a new password, retype the password in Confirm password, and then click OK.The password that you specify is not significant because the system will generate a strong password automatically independent of the password that you specify.
Reset Password

Please note that krbtgt user is disabled and should not be enabled! 

The password history value for the krbtgt account is 2, meaning it includes the 2 most recent passwords. By resetting the password twice you effectively clear any old passwords from the history, so there is no way another DC will replicate with this DC by using an old password.

Posted in 2025, Kerberos | Leave a comment

Change time zone with command prompt

You can use the following command to see the different time zones

tzutil /l

Once you have found the time zone that you want to change, then use

tzutil /s “Romance Standard Time”

This should change your time zone.

Posted in 2025, Uncategorized | Leave a comment

How to update the Policy Definitions template

Administrative templates are divided into admx and language files(adml files).

Windows uses central store to store the files, the central store is located on the sysvol share which is located here:
\\contoso.com\SYSVOL\contoso.com\policies\PolicyDefinitions

To update the definitions you will have to download and install the latest version, which you can find here:
https://www.microsoft.com/en-us/download/details.aspx?id=106254

Once you have install it copy all files from the it will be located in either of the 2 places:

  •  C:\Windows\PolicyDefinitions
  • C:\Program Files (x86)\Microsoft Group Policy\<version-specific>\PolicyDefinitions

And place them into sysvol folder

  • \\contoso.com\SYSVOL\contoso.com\policies\PolicyDefinitions
Posted in 2025, Uncategorized | Leave a comment

Hardened UNC Paths and why

Note; If the environment exclusively contains Windows 8.0 / Server 2012 (non-R2) or newer systems, then the ‘Privacy’ setting may (optionally) also be set to enable SMB encryption. However, using SMB encryption will render the targeted share paths completely inaccessible by older OSes, so only use this additional option with caution and thorough testing.

Why Harden UNC Paths in Windows Active Directory?

Hardening UNC (Universal Naming Convention) paths in Windows Active Directory is crucial for enhancing security and protecting sensitive data. UNC paths are used to identify and access network resources such as shared folders, printers, and other services1. By default, these paths are susceptible to various security threats, including man-in-the-middle attacks, credential theft, and unauthorized access2.

Key Benefits of Hardening UNC Paths:

  1. Mutual Authentication: Hardened UNC paths enforce mutual authentication between the client and the server, ensuring that both parties verify each other’s identity before establishing a connection2. This prevents unauthorized access and protects against impersonation attacks2.
  2. Integrity Protection: By requiring integrity checks, hardened UNC paths ensure that data transmitted between the client and the server remains unaltered during transit2. This helps detect and prevent tampering or data corruption.
  3. Enhanced Security Policies: Hardened UNC paths allow administrators to define specific security policies for critical network shares, such as SYSVOL and NETLOGON2. These policies can include encryption, access controls, and logging to monitor and audit access attempts.
  4. Compliance with Security Standards: Implementing hardened UNC paths helps organizations comply with industry security standards and best practices, such as the Security Technical Implementation Guides (STIGs) and the National Institute of Standards and Technology (NIST) guidelines.

How to Harden UNC Paths:

To harden UNC paths in Windows Active Directory, follow these steps:

  1. Open the Group Policy Management Console (GPMC).
  2. Create a new Group Policy Object (GPO) or edit an existing one.
  3. Navigate to Computer Configuration > Policies > Administrative Templates > Network > Network Provider.
  4. Double-click on Hardened UNC Paths and select Enabled.
  5. And specify the following

Value Name: \\*\NETLOGON
Value: RequireMutualAuthentication=1, RequireIntegrity=1

Value Name: \\*\SYSVOL
Value: RequireMutualAuthentication=1, RequireIntegrity=1

See here on how to update the GPO template

Posted in 2025, Uncategorized | Leave a comment

Import Group Policy on a local machine

Importing a group policy can both be very nerve wracking but also quite easy.

Things you’ll need:

I assume that you already have a admx file and want to import it for the local machine.

Login to the server and open a command prompt as administrator. Here we assume the LGPO.exe has been extracted to the C:\Users\NAME\Downloads\

  • cd into the directory where the lgpo.exe is extracted (cd C:\Users\NAME\Downloads\)
  • then use lgpo.exe /g (path to admx file C:\Users\NAME\Downloads\ADMXFOLDER\)

It’s as simple as that.

You can also backup the current configured policies by using “lgpo.exe /b C:\Users\NAME\Downloads\BackupGPO”

Posted in 2025, Uncategorized | Leave a comment

Enable Temporary Admin Privileges for Controlled Folder Access via Intune EPM

Prerequisites

  • Licensing: Ensure your tenant has the Intune Endpoint Privilege Management (EPM) add-on license (Intune Suite). EPM isn’t included in the basic Intune Plan 1; it requires a paid add-onlearn.microsoft.com.
  • Platform: Devices must be Windows 10/11 (with required updates) and enrolled in Intune.
  • Controlled Folder Access (CFA): Typically CFA (ransomware protection) is already enabled via Intune’s Attack Surface Reduction (ASR) policy. If not, create an ASR policy in Intune to turn on CFA (or Audit mode) and configure protected folders.

1. Configure Intune Attack Surface Reduction policy (Optional)

If CFA is not yet enabled via Intune, create an ASR policy:

  1. In the Intune admin center, go to Endpoint security > Attack surface reduction and click Create policy. This opens the profile creation wizard for ASR rules.
  2. In Configuration settings, set Enable Controlled Folder Access = Enabled (or Audit mode for testing). Add any extra folders to protect if needed. Under Controlled Folder Access Allowed Applications, click Add apps and browse to include any applications you want pre-approvedlearn.microsoft.com. This pre-populates trusted apps so users don’t have to add them manually. Finish the wizard to deploy the policy.

In the Basics page, set Platform = Windows 10 and laterProfile = Attack Surface Reduction Rules, and click Create

(The above steps enforce CFA via Intune. If CFA is already on, you can skip straight to EPM configuration.)

2. Enable Endpoint Privilege Management (EPM) in Intune

  1. In the Intune admin center, go to Endpoint security > Endpoint Privilege Management > Policies and click Create Policy.
    • Set Platform = WindowsProfile = Windows elevation settings policy. Give it a descriptive name (e.g., CFA Elevation Settings).
  2. In the Configuration settings of the elevation settings policy:
    • Endpoint Privilege Management: Set to Enabled. This turns on EPM on the devicelearn.microsoft.com.
    • Default elevation response: Choose one of:
      • Require user confirmation: The user will get a simple UAC-like prompt when requesting elevation. You can optionally add Business justification or Windows authentication requirements to the promptlearn.microsoft.com.
      • Require support approval: The user is prompted to submit a request to IT when an unmatched app is elevatedlearn.microsoft.com. An admin must approve it in Intune before elevation proceeds.
        For example, setting Require user confirmation lets the user self-elevate (with a prompt/justification) without immediate admin review. Setting Require support approval forces an approval workflowlearn.microsoft.comtechcommunity.microsoft.com.
  3. Configure Reporting scope as desired (e.g. “Diagnostic data and all endpoint elevations”).
  4. Assign this policy to the user or device groups containing the target machines. Click Review + create to save the policy.

3. (Optional) Create Windows Elevation Rules

You can create specific EPM elevation rules for known executables to allow them elevated access without extra prompts:

  1. In Endpoint Privilege Management > Policies, create a new policy with Profile = Windows elevation rules policy.
  2. Add a rule for the executable you want to elevate. For example:
    • Name: “PowerShell Elevation”
    • File name: e.g. powershell.exe (full path or certificate)
    • Elevation type: User confirmed (or Automatic if fully trusted)learn.microsoft.com.
    • (Optional) Add the file hash or publisher certificate to tightly identify the app.
  3. Assign this policy to the same user/device group.Example: Creating a rule for PowerShell (C:\Windows\System32\WindowsPowerShell\v1.0\powershell.exe) with elevation type User confirmed means users can right-click PowerShell and elevate without requiring an admin approval every time. Similarly, you could target the Windows Security/Defender UI (though as a UWP app it’s harder to target by filename).

4. Adjust Defender and Tamper Settings for Local Changes

  • Local admin merge: In an Intune Defender policy (Endpoint security > Antivirus), ensure Defender local admin merge (DisableLocalAdminMerge) is set to Not configured or Nolearn.microsoft.com. This allows unique items added by a local admin to merge into the effective policy. By default (Not configured/No), any allowed apps added locally will be included in addition to the Intune-defined listlearn.microsoft.com. (If you set DisableLocalAdminMerge = Yes, local changes are ignored.)
  • Tamper Protection: If Tamper Protection is enabled in Defender, it will block local changes to CFA settings. You may need to disable Tamper on the device or use the Defender “Troubleshooting mode” during the change. Microsoft notes: “When tamper protection is turned on, tamper-protected settings can’t be changed… we recommend using [Troubleshooting mode] to temporarily disable tamper protection on the device. After the troubleshooting mode ends, any changes made… are reverted”learn.microsoft.com. In practice, if Tamper is on tenant-wide, you could exclude the target device from Tamper or briefly disable it so the user’s addition takes effect.

5. User Procedure: Elevate to Add Allowed Apps

With the above configured, a standard user can request elevation and add an allowed app:

  1. Run with elevated access: The user locates the application to allow (for example, C:\Program Files\MyApp\app.exe), right-clicks it, and chooses Run with elevated access. (Alternatively, they can right-click PowerShell or Command Prompt in the Start menu and select More > Run with elevated access.) This EPM context-menu action prompts the elevation flowtechcommunity.microsoft.com.
  2. Approve elevation: Depending on your EPM default settings:
    • If Require user confirmation was chosen, the user will see a prompt (optionally requiring justification or Windows login) and can approve the elevation immediately.
    • If Require support approval was chosen, the user will enter a justification and submit a request. An Intune administrator will receive the request and must approve it in the Intune Elevation requests panetechcommunity.microsoft.com. Upon approval, the process runs elevated.
  3. Add the allowed app: Once elevated, the app or PowerShell can now modify CFA. For example, if in PowerShell, run:powershellCopyEditAdd-MpPreference -ControlledFolderAccessAllowedApplications “C:\Program Files\MyApp\app.exe”
    This cmdlet appends the app to the CFA allowed listlearn.microsoft.com. (If using a UI, the user can open Windows Security > Virus & threat protection > Manage ransomware protection > Allow an app through Controlled folder access, and add the executable.)Now the app is trusted by CFA. The elevation lasts for that session (and any child processes) as if the user were a local administrator. After use, the user can simply close the elevated window. If you used support-approved elevation, Intune will automatically revoke the temporary admin access after 24 hours unless re-approvedtechcommunity.microsoft.com.

6. Alternative: Intune Script for Allowed Apps

If you prefer not to involve the user, an administrator can pre-assign allowed apps via Intune or script:

  • Intune script: Deploy a PowerShell script (as System) that runs Add-MpPreference -ControlledFolderAccessAllowedApplications "<path>" for the needed executableslearn.microsoft.com. The script would need to run with admin rights (EPM could elevate it, or Intune can run it as System).
  • MDM CSP: Use the Policy CSP ./Vendor/MSFT/Policy/Config/Defender/ControlledFolderAccessAllowedApplications to add allowed apps via Intune’s Settings Catalog or custom OMA-URIlearn.microsoft.com. This is essentially the same as the ASR policy “Allowed Applications” setting.

7. Caveats, Risks & Best Practices

  • Least privilege: Granting any elevation (even temporarily) raises risk. Only use EPM for users/tasks you trust. Monitor EPM logs (in Intune) to review who is elevating which apps. Consider setting Default elevation response to User confirmation for lower friction, or Support approval for more control.
  • Tamper and merge: Be aware that disabling Tamper Protection or enabling local merging deviates from Microsoft’s recommended security posturelearn.microsoft.comlearn.microsoft.com. It may expose settings to tampering or inconsistency. If you must re-enable Tamper/protecting lists afterwards, plan for it.
  • Time limits: By design, approved elevations expire. The Intune admin dashboard shows pending and approved requests, and you can convert frequent requests into permanent rules if needed. For example, if a user repeatedly needs one app elevated, create a permanent EPM rule for it (this still requires admin creation)techcommunity.microsoft.com.
  • Documentation: For more on EPM configuration, see Microsoft’s Intune docs on EPM policies and Elevation rules (Microsoft Intune documentation). For CFA details, see Customize Controlled Folder Access (PowerShell, CSP, UI options) and Enable CFA via MDM.
Posted in 2025, Uncategorized | Tagged | Leave a comment